Updating your Asrock motherboard’s BIOS can sometimes hit a snag, especially when you’re greeted with the dreaded “No Image File Detected” error. It’s a hiccup that many face, but don’t worry, you’re not alone. Understanding why this happens is the first step to a smooth update process.
You might be scratching your head, wondering why your BIOS won’t recognize the image file. Often, it’s as simple as having the wrong file format for your USB drive or selecting the incorrect BIOS update file for your motherboard model. But fear not, with a few tweaks, you’ll be on your way to a successful BIOS update.
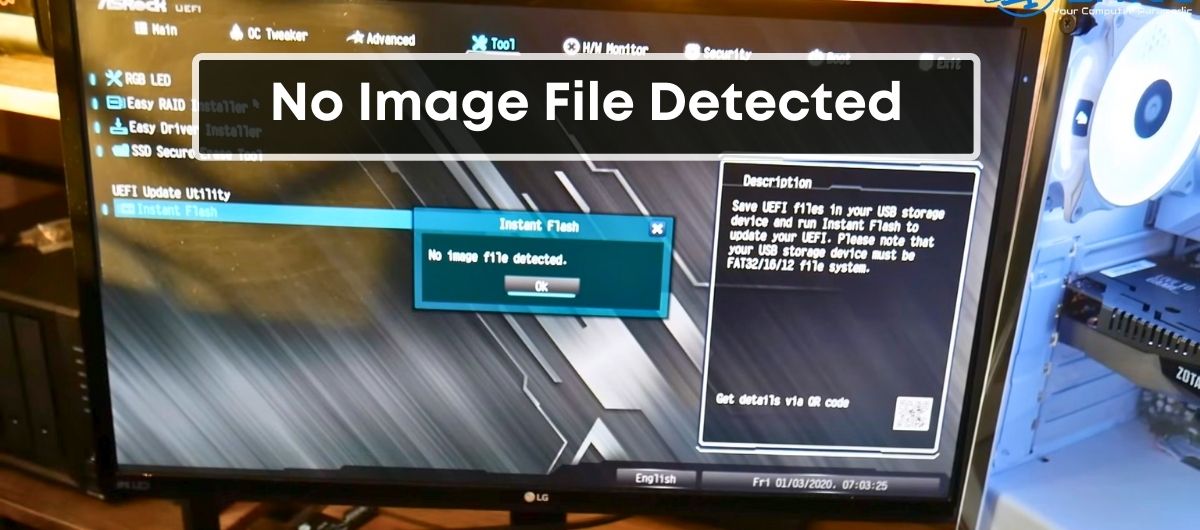
How to Fix the ASRock No Image File Detected Error?
This error typically indicates that the BIOS update utility is unable to recognize or find the BIOS update file on the storage device you’re using, usually a USB flash drive.
First, make sure you’ve downloaded the correct BIOS file for your specific motherboard model from the ASRock website.
Then, format your USB drive to FAT32 and place the BIOS file directly on the root of the drive, not inside any folders
Lastly, plug the USB drive into different USB ports on your computer.
Preferably, use a USB port directly on the motherboard rather than through a USB hub or the front panel of the PC case.
What is a BIOS Update?
A BIOS (Basic Input/Output System) update can be a crucial fix for your computer’s hardware issues. It’s essentially the software that initiates the hardware of your PC when you turn it on. An updated BIOS optimizes the interaction between the operating system and the hardware, correcting any incompatibility issues that might be causing problems. Manufacturers release BIOS updates to add new functionalities or patch existing security vulnerabilities.
When your PC faces persistent hardware problems that neither drivers nor the operating system can resolve, a BIOS update might be the remedy. It’s generally suggested to update your BIOS only if directed by the manufacturer or if you’re experiencing specific hardware malfunctions. Unlike software updates, the BIOS update process is nuanced and, if not executed properly, could lead to hardware damage. Pay close attention to instructions provided by your motherboard’s manufacturer.
It’s important to understand that a BIOS update is not a routine maintenance task. You shouldn’t update the BIOS just because there’s a newer version available. The rule of thumb is: if your system is running smoothly, leave the BIOS alone.
During a BIOS update on an Asrock motherboard, not having the correct BIOS file can trigger a “No Image File Detected” error. The motherboard needs a specific file to update the BIOS, and an error in the file format or version could lead to a failed update. Ensuring the update file matches your motherboard model is key for a successful BIOS flash.
Always use a USB drive formatted to FAT32 as other formats like NTFS or exFAT may not be recognized during the BIOS update process. Transferring the correct file onto your USB stick is just one step in the entire procedure, so it’s crucial to follow the full guidelines given by Asrock to prevent any complications. Remember, each motherboard may have a slightly different process for updating the BIOS, underscoring the importance of consulting specific model instructions.
Why is Asrock BIOS not Detecting Image Files During Updates?
Updating your Asrock motherboard’s BIOS can be a straightforward process, but sometimes you might encounter the perplexing “No Image File Detected” error. Understanding why this happens is key to a smooth update experience.
Wrong Format of Your USB
The format of your USB flash drive is crucial when attempting a BIOS update. It needs to be compatible with the BIOS interface to be recognized properly. If you’ve formatted your USB drive as NTFS, you’ll run into issues since Asrock motherboards’ BIOS systems typically require the FAT32 format. FAT32 is widely recognized for BIOS updates due to its older and more compatible file system structure.
To avoid this problem, make sure you format your USB drive to FAT32 before attempting the update. Most USB drives come preformatted with NTFS, which means you will need to reformat them manually.
Selecting Wrong BIOS Update
Another common pitfall is selecting the incorrect BIOS update file for your specific motherboard model. Given the variety of motherboard models like AB350 Pro4 or AB350M Pro4, it’s easy to download the wrong update if you’re not paying close attention. The result is that your system cannot recognize or apply the update, leaving you with the “No Image File Detected” message.
Always double-check the model number of your motherboard and download the corresponding BIOS update file directly from Asrock’s official support page.
Not Unzipping the Update Files
When you download a BIOS update, it’s often in a compressed format. The zipped file must be unzipped before the BIOS can read and utilize the update. If you skip this step and try to update with a compressed file, you’ll likely see the error message in question. Make sure to extract all contents from the downloaded ZIP file to your FAT32 formatted USB drive before proceeding with the BIOS update process.
Wrong UEFI Settings
Your system’s UEFI settings also play a vital role in BIOS updates. If these settings are incorrect or misconfigured, your system might not recognize the update files on your USB drive. One common UEFI-related issue is when the settings are not aligned with the storage configurations or security protocols needed for a BIOS update.
Review your UEFI settings to ensure they’re configured correctly for updating the BIOS, and consult your motherboard’s manual or online resources if you’re uncertain about the proper setup. Adjustments may include temporarily disabling certain security features or booting in UEFI mode rather than Legacy mode.
What to do whenAsrock BIOS update does not detect image files?
When you’re faced with an Asrock BIOS update that won’t detect image files, you’ve got several options. This guide will walk you through the appropriate steps to ensure a smooth update process.
Format the USB with FAT32
Formatting your USB drive correctly is crucial for BIOS recognition. Here’s how you can ensure your USB drive is properly formatted to FAT32:
-
- Right-click on the Start button and search for Disk Management.
- Locate your USB in the pop-up screen.
- Right-click on the USB and select the Format option.
- Choose FAT32 from the dropdown list and confirm.
By Disk Management:
-
- Open File Explorer with the Win+E shortcut.
- Locate and right-click on your USB drive.
- Select Format and choose FAT32 from the dropdown list.
- Click Start to commence the formatting process.
Directly Format to FAT32:
Remember, if your USB drive is not formatted to FAT32, the No Image File Detected error is likely to occur.
Download BIOS Update
To avoid any compatibility issues, downloading the correct BIOS update is imperative. Don’t rush this step—ensure accuracy:
- Go to the official Asrock website.
- Navigate to the Support or Downloads section.
- Find your specific motherboard model.
- Download the BIOS update file that corresponds to your motherboard.
It’s vital to match the motherboard model and BIOS file to prevent mishaps that could potentially harm your hardware.
Unzip the Update File
Once you’ve downloaded the right file, the next step is to unzip:
- Locate the downloaded update file on your computer.
- Right-click on the file and select “Extract” or “Unzip.”
- Ensure all extracted files are saved on the formatted FAT32 USB drive.
Unzipping the file is non-negotiable—BIOS updates cannot be read if they remain in a compressed file format.
By meticulously following these steps, you should be able to tackle the “No Image File Detected” issue with ease, paving the way for a successful BIOS update.
How do you update Asrock BIOS?
Upgrading your Asrock motherboard’s BIOS is crucial when you’re tackling hardware issues that software fixes can’t resolve. Before beginning the update process, ensure that you’re prepared to avoid any potential complications.
Firstly, verify the current BIOS version of your motherboard. You can find this information readily accessible in the BIOS menu. Knowing your current version helps you determine if an update is necessary and which version to download from Asrock’s official website.
Next, create a backup of your existing BIOS. This safety measure allows you to revert to the previous state should an anomaly occur during the update. Most motherboards offer a simple utility to backup your BIOS within the existing BIOS setup menu.
Once you have a backup, download the latest BIOS file specifically for your motherboard model from Asrock’s support page. It’s paramount that you select the correct motherboard model and corresponding BIOS version to avoid any mismatches that could lead to further issues.
After downloading the file, prepare a USB drive formatted to the FAT32 file system. This format is universally compatible with BIOS update utilities. Copy the unzipped BIOS file to the root directory of your USB drive – no other files should be present to prevent any confusion during the update process.
To perform the BIOS update, reboot your PC and access the BIOS/UEFI setup. Look for the built-in utility designed for updating the BIOS; this might be referred to as ‘Instant Flash’, ‘EZ Flash’, or similar names. From there, select the update file on your USB drive and confirm the update. It’s critical to ensure your PC remains powered during this process. Loss of power could corrupt the BIOS, rendering your motherboard inoperable.
During the Update:
- Do not turn off your PC
- Do not remove the USB drive
- Allow the update process to complete fully before rebooting
Remember to reset your BIOS settings to their default state post-update if recommended by Asrock, and adjust any custom settings you had before the update. This helps ensure your motherboard interfaces correctly with all your hardware components.
Conclusion
Updating your Asrock BIOS can be a smooth process when you follow the right steps. Ensure you’ve got the correct BIOS version for your motherboard and that your USB is properly formatted. Remember, patience is key—rushing might lead to errors or even hardware issues. After the update, a quick reset to default settings will have your system running optimally. With these tips, you’re now ready to tackle BIOS updates with confidence.
Frequently Asked Questions
How do I verify my current BIOS version on an Asrock motherboard?
To verify your BIOS version, restart your computer and press the key to enter the BIOS setup (usually F2, F10, DEL, or ESC). Once in the BIOS/UEFI setup, the BIOS version is typically listed on the main screen or under the “System Information” or “Main” tab.
What should I do before updating my Asrock motherboard’s BIOS?
Before updating your BIOS, back up the current settings and important data. Verify your motherboard model and BIOS version, download the correct update from Asrock’s official website, and ensure your system is stable (no system crashes or power outages). Format a USB drive to FAT32 and place the update file onto it.
How can I download the latest BIOS update for my Asrock motherboard?
Visit the Asrock support page (https://www.asrock.com/support/index.asp), input your motherboard model to find its support section, and download the most recent BIOS update available. Always download files from the official manufacturer’s website to avoid malware or incorrect versions.
Why might my Asrock BIOS not detect the image file during an update?
If the image file isn’t detected, it could be due to the USB drive format (must be FAT32), incorrect BIOS file, the USB port not working correctly (try a different port), an outdated BIOS version that requires incremental updates, or a corrupt download/file.
How do I resolve the “No image file detected” message during a BIOS update?
Firstly, ensure your USB drive is properly formatted to FAT32 and that the BIOS file is not corrupted. Then, recheck that you’ve downloaded the correct BIOS version for your motherboard model. If the problem persists, try another USB drive, use a USB 2.0 port, and confirm the file isn’t named incorrectly or placed within subfolders on the USB drive.